Air Bending vs. Bottom Bending: Choosing the Right Punch and Die
Air Bending vs Bottom Bending: The Engineering Guide to Die Selection
To stay competitive in a modern fabrication shop, you can’t afford to guess which bending method to use. Choosing between Air Bending and Bottom Bending isn’t just about the angle on the blueprint—it’s about tonnage limits, tool wear, and the material’s grain.
If you’re running a modern CNC press brake, you’re likely air bending. If you’re running an older mechanical brake or need extreme repeatability on thin gauges, you might be bottoming. Choosing correctly isn’t just a preference—it’s about protecting your machine and your margins.
Here is the shop-floor breakdown of these two methods and how to choose the right punch and die for each.
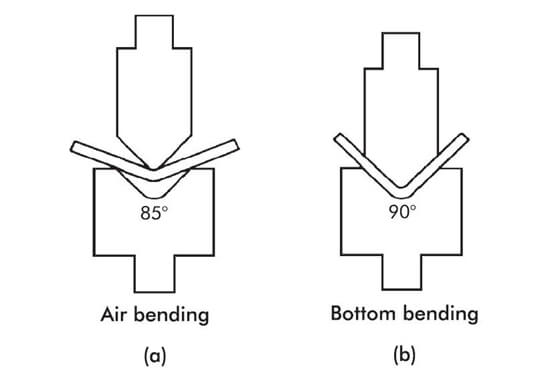
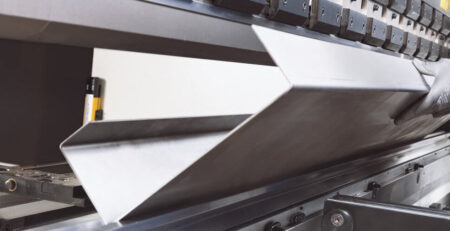
1. Air Bending: The Versatile Modern Standard
In air bending, the punch never hits the bottom of the V-die. The material only makes contact at three points: the punch tip and the two top edges of the die. which means ,The material is never actually pushed all the way to the bottom of the die.Air bending relies on the precision of the Press Brake Tooling rather than the force.
The bend angle is determined by how deep the punch descends into the die (the stroke). Because the material doesn’t touch the bottom, you can use one 88-degree die to create any angle from 90 to 135 degrees.
- The Tooling Setup: You typically use a punch with a sharp angle (like 30° or 45°) and a V-die that is significantly wider than the material thickness.
- The Advantage: Flexibility. You can produce multiple angles (90°, 120°, 135°) using the same set of tools simply by adjusting the depth of the stroke.
- The Trade-off:You have to account for springback. Since the metal isn’t being “set,” it will open up slightly once the pressure is released. This requires a high-quality CNC and an operator who understands material K-factors.
For high-precision air bending applications, our Trumpf Press Brake Tooling (Wila Style) ensures the tightest tolerances.
Expert Insight: Air bending is the only way to go if you are working with heavy plates or high-tensile alloys. To keep these tools performing for years, follow our internal checklist on [How to Extend the Life of Your Press Brake Tooling]

2. Bottom Bending: For High-Repeatability
Bottoming is a more traditional method where the punch forces the material into total contact with the V-die. The angle of your tool (usually 90°) is exactly the angle you get in the part.
- The Tooling Setup: The punch and die angles must match your target angle perfectly. If you want a 90° bend, you use a 90° punch and a 90° die.
- The Technical Logic: Unlike air bending, the angle of your part is dictated by the angle of your tools. If you want a 90-degree bend, you need exactly 90-degree tools.
- The Advantage: Accuracy and consistency. It kills springback. By forcing the material into the bottom of the die, you “crush” the neutral axis of the metal, making it hold its shape with much higher repeatability than air bending, regardless of minor material thickness variations.
- The Trade-off: High tonnage and high wear. You need 3 to 5 times the pressure of air bending to “set” the metal. If your operator isn’t careful, this can lead to “coining” (over-tonnage), which can crack a standard die or damage the press brake ram.

3. Air bending VS Bottom bending:Comparing the Impact on Your Shop Floor
| Factor | Air Bending | Bottom Bending |
| Angle Range | Multiple angles with one tool | One tool per angle |
| Tonnage | Low (Machine-friendly) | High (Heavy wear) |
| Springback | High (Requires over-bending) | Low (Excellent stability) |
| Tooling Angle | Sharp (30°, 45°, 88°) | Target-matched (90°) |
| Ideal For | High-mix, heavy plate | Thin gauge, high-volume |


4. Air Bending vs Bottom Bending:How to Choose the Right Punch and Die
Step A: Check Material Thickness & Tensile Strength
If you are working with high-tensile steel or very thick plate such as 10mm or harden material, Air Bending is usually the only safe option to avoid breaking your tools or exceeding your machine’s tonnage. Air bending allows you to use wider V-openings to keep tonnage within safe limits. However, different alloys react differently to the V-opening. Check out our [Ultimate Guide to Press Brake Tooling Materials] to match your alloy to the right tool steel.
STEP B:Part Complexity vs. Volume
If you have a job with five different angles on one part, Air Bending is the only logical choice. You won’t have to stop the machine to change tools for every angle. However, if you have a contract for 10,000 identical electrical cabinets, Bottom Bending will give you much better consistency without needing a top-tier CNC system.
Step C: Identify Your Tolerance Needs
If the job requires ±0.5-degree accuracy across 1,000 parts and your machine is older, Bottom Bending is the safer bet. It removes the “guesswork” of material inconsistency.
Are you seeing cracking at the bend line? That often happens when operators try to “bottom” with a punch radius that is too sharp. If you find that even bottoming is causing issues like cracking, you may be facing one of the [5 Common Bending Defects] that require a custom approach.
Step D: Standard vs. Custom Tooling
For standard 90-degree bends in common gauges, standard tool sets work fine for both methods. But if you are air bending complex geometries or “J-bends” where clearance is tight, standard catalogs won’t help. This is where a [Cost-Benefit Analysis of Custom vs. Standard Tooling] becomes essential for your ROI.

Final Decision: The Operator’s View
At JSTMT, we generally recommend Air Bending for 90% of modern fabrication needs. It’s faster, more versatile, and easier on your machine. Air Bending is about speed and versatility, while Bottom Bending is about stability and repeatability.
But if your project demands absolute 0.5-degree repeatability on thin-gauge parts, Bottoming is a valid tool in your arsenal—provided you have the right hardened press brake dies to handle the pressure.
If you are constantly switching between 10-gauge and 14-gauge jobs, stick to Air Bending to minimize setup time. If you have a contract for 5,000 identical electrical boxes, Bottoming will save you from checking every tenth part for angle drift.


Leave a Reply